The Perfect Stocking
- SeamsRightDesign
- Nov 12, 2019
- 3 min read
Updated: Jul 1, 2020

Ever tried to find the perfect set of Christmas stockings? Impossible. If you’re lucky enough to find the perfect fabric or color, it is always offset by a horrendous shape or vice versa. But mostly, I see stockings at stores that are so cheesy and cheap looking and over appliquéd and I don’t know, just bad. So here’s your chance to rectify the situation - no matter your design aesthetic!
This is also the most hackable (customizable) project. Seriously, endless options. Here are the instructions for the basic, classic version and but keep your eye out & we'll do follow up posts with some great edits in the coming weeks!

REQUIREMENTS:
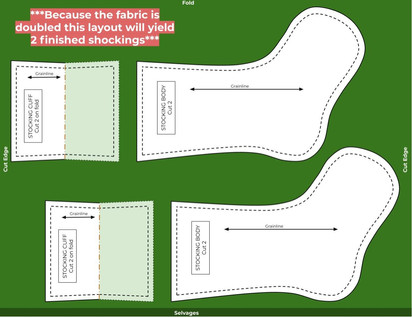
Yardage: (will make 2 Stockings)
All One Fabric - 1 yard
Contrasting Cuff/Body - 1/3 yard Cuff Fabric and 2/3 yard Body Fabric
Fabric Suggestions: Flannel, Plaids, Linen, Woven Cottons, Felt, Sweater Knits (not for beginners), Faux Fur... Honestly you can make almost anything work if you plan accordingly like stabilizing (with felt or interfacing) stretchy or loosely woven fabrics. Plan on lining any sheer fabrics.
PREPARATION:
Print the pdf & Line up/tape the papers to form the patterns. You'll notice 2 outlines on the patterns: THE OUTER IS THE CUTTING LINE, the inner is the stitching line (⅜”)
Stocking Body: Cut 2 (Cut 2 Stocking Body Lining/Felt/ Interfacing if needed)
Stocking Cuff: Cut 2 on the fold (you'll have to pin and cut around all but the "Place on Fold" edge, then flip & pin to cut the second side)
6” Hanging trim (Ribbon, Yarn, Twine, Strung Beads…)
CONSTRUCTION:
1. With RIGHT SIDES TOGETHER Sew around the stocking body (leaving the top open) & down the sides of the cuff at ⅜”. Seam finish with serging or zigzagging.
***If your fabric needs lining or stabilizing: Place MAIN body fabric pieces with Right Sides Together, then layer your lining/stabilizer one on either side of the stocking with the Right Side (if there is one) FACING OUTWARD. Pin and sew at ⅜” then seam finish with serging or zigzagging.***
2. Turn both the body and cuff right side out & press (iron) flat. Fold the cuff into itself in half wrong sides together (should look like a cuff at this point) & press (iron) flat.
3. Slip cuff into body, match up side seams and pin in place.
4. Fold hanging trim in half and tuck it in between the body and cuff in the corner, pin in place.
5. Sew around at ⅜” and seam finish.
6. Flip cuff to the outside, leaving the seam a little to the inside and press as needed. 7. Hang & Enjoy your holidays!
You may also like to add something extra to your stockings to personalize them for each member of your family. My families are the sweater stockings in the top picture. Each has something unique in the top corner. Other ways could be using a unique fabric within a color palate for each person, a personalized ornament attached to each, an embroidered cuff... etc. Please share with us your other ideas customize stockings!
Or maybe you want them to all be simple and the same. Totally gorgeous to have that clean repetition! 😍
Soon we'll be highlighting several hacks to this pattern to make it more your own and unique ways to use different materials!
Thanks for following along and supporting us and as always remember to tag us in your pictures because we are so excited to see your labors of love for your families and homes!!! #seamsrightstockings


Comments