How to Sew a Face Mask
- SeamsRightDesign
- Mar 23, 2020
- 3 min read
Updated: Jul 1, 2020
Simple, Easy, and Quick to Reproduce

Thanks to Covid-19 the fears and the feelings of panic and uselessness are global. Perhaps one of the best ways we can combat that is to take action to serve and protect our families, our communities and those on the front lines.
"[We] who stay at home at home to help reduce risks have been busy sewing face masks for others. And it's us who feel like we've received." - Ellie of Le Cafe De Maman
As the call for face mask came from across the country I knew I had to get involved. But in all honesty when I sat down to read the instructions provided by the Deaconess Health System I was so confused and frustrated. So I watched their video, and I was only slightly less confused and frustrated. I knew if I was feeling this way others were too & I knew I had to act. So this is the same design as their pattern only I've reworked it to make the construction much clearer and can be made in larger quantities easier.
So in this post you will find a Sew-A-Long Video, Pattern Tutorial, PDF Instructions, and tips for making several at a time.
Please share this with all those you know looking to help contribute in some way. Do it with your kids and let them turn masks right side out and trim threads.
DISCLAIMER: I am not saying that fabric masks are an equal alternative to medical grade masks or making any claims about their effectiveness. For health care professionals these masks are meant to be an extra barrier over their medical grade masks to help prolong use in an extreme shortage. They may also be used when other suitable face masks are unavailable.
The CDC has given this statement "In settings where face masks are not available, HCP [health care professionals] might use homemade masks (e.g., bandana, scarf) for care of patients with COVID-19 as a last resort." (link to source)
Face Mask Instructions
SUPPLIES
- ¼ Yard - 100% Cotton Tightly Woven Fabric
- 14” - ⅛”-¼” flat elastic
- Thread
- OPTIONAL 6"x9" - Felt for a Filter
PREPARE
· Cut 2 - 6” x 9” of Fabric (5” x 7 ½” children)
· Cut 2 - 7” Elastics (5-6" for children depending on age)
CONSTRUCT

1. Pin elastic in place on the right side of the 6” edge ⅜” in from the long edges (as shown in picture.
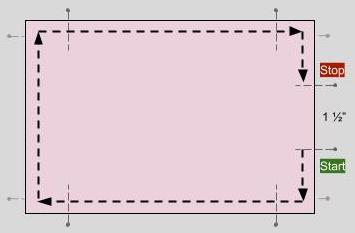
2. Place 2nd fabric on top with right sides together and pin. Mark a 1 ½” opening in the center of a 6” side.
Note: If adding the optional felt filter, place it on top of the 2nd fabric. This way when it is sewn and flipped it will be on the inside of the mask.
3. Sew from beginning to end at ¼”, pivoting at the corners. Remember to leave an opening!
4. Flip Right Side Out & Press Flat
6. Fold & Pin 3 - ⅜” pleats on each short side, make sure they are all facing the same direction!
7. Top Stitch around at ¼” and DONE!
Tips for Mass Production
Do the same step on all of them before moving on to the next step. Examples: Cut all your fabric at once, pin on the elastics to all at once, sew the same step on all of them, turn all of them, pleat all of them... this will save you sooooo much time!
Chain stitch - This means once you've finished sewing one piece, do not pull out of your machine and cut your thread. Instead pull just enough to place the next piece under the presser foot and start sewing. After they're all sewn, trim all of the threads!
Download a PDF of the Face Mask Instructions
To download the FREE PDF of these instructions go to our Face Mask Pattern in our Store and use promo code ALWAYSFREE at check out. We will never charge for this pattern, this is just the e-commerce work-around to make the pattern free!
Thank you for following along, for spreading positivity, and serving those around you! This is the best community to be a part of!!!
We would love to see what your masks so please tag us in your makes on Instagram - @SeamsRightDesign


Comments